
Sep '04 - Aug '08

Once again, welcome back to Elite Modeling School. We hope you've been following along, otherwise you may want to jump in the time machine. As a reminder, we're not focusing on extreme cases: this tutorial is about optimizing your workflow in Rhino. In fact, this is the last day of Rhino tips (for now, at least) and subsequent days will focus on Illustrator and Photoshop.
The instructions here will be fairly brief. Please download the scripts and give them a whirl; everything covered here will be pretty straightforward. If you have further questions or suggestions to share you can post them in the comments below.
All scripts mentioned below are available here.
Looking Good
So far we've covered important things like optimizing your keyboard usage, some replacements for general commands like DISTANCE, even a little Boolean magic, but now it's time to get frivolous. Let's talk about making Rhino look better. Since we spend too much time staring at the screen anyways, you may as well take just a few minutes to make sure it's easier on the eyes.
The first and most important thing I can mention is that you must take command of your layer colors. Nothing kills me more than seeing a model or drawing in the obnoxious primary colors imported from CAD. This is an offense to the eyes and we're supposed to be a discipline of visual people! (I know that there are some legacy reasons to use default colors but since you're reading a school blog we'll ignore those)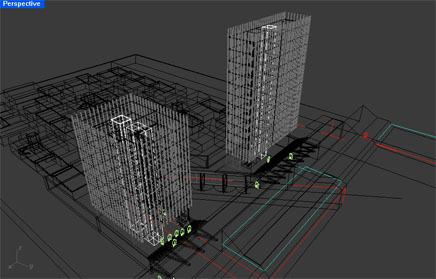
With a little bit of effort spent on picking colors your wireframe model will be much more legible. If your video card is lagging on ghost or shaded modes then switching to wireframe will allow you to work much more quickly. It's also a surefire way to start developing xray vision!
While we're at it, how about inverting the color of the tooltips so that they're white on black.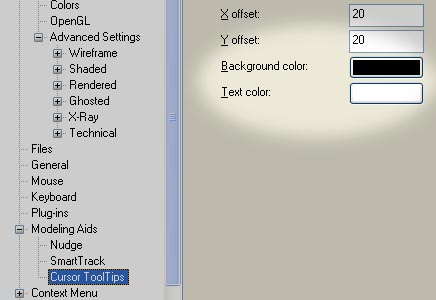

Oh, great. Inverted tool tips.
And since you're already tinkering with the view options I suggest turning on "single click maximize" which will save you precisely half a second every time you need to switch in or out of the 4-up viewport mode.
I don't know why this is even an option
The final issue on the topic of changing the look of rhino is gradient background mode. When this was first introduced in one of the Service Packs people in the trays at the GSD would turn it on to simulate CATIA. There's a reason why CATIA features a gradient background, however, and that's because it can increase legibility of your model in some cases. I've included a sample here so you can judge for yourself. To turn this on, either run the command "GradientView" or find the "background" option in your appearances settings and specify a "2 Color Gradient" instead of "Use Application Settings".
Look at that horizon effect!
Quick Toon Output
Since this is the last day of Rhino tips and Elite Modeling School will soon be turning its attention to other applications, I figured a good final tip would look at exporting drawings from Rhino. (If you haven't already made yourself familiar with the power of "Section", and "Make2d" this would be the time to do so.)
Oftentimes I find myself wishing that I could beef up a rendering from Rhino with a little more definition in the form of a line work overlay. Luckily, you can render a scene and then use "Make2d" to produce a 2D drawing which may be overlayed on top of the rendering. The problem is that it takes a bit of fidgeting in Photoshop or Illustrator to get the lines scaled so that they fit on top of the rendering and match perfectly.
To ease this process I've provided a script called Viewmaker which will make a create a "viewport boundary" curve and then run Make2D. This means that you can easily scale the viewport boundary curve to match the rendering that you made from the same viewport and it will automatically match perfectly. Follow the images below for a clearer idea of what I'm talking about.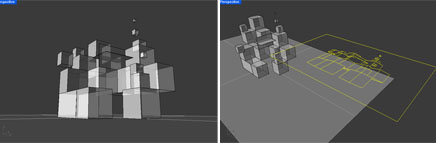
Left: The viewport that we used for a VRay rendering AND the Viewmaker script. Right: Results of the viewmaker script, a make2d drawing with the extents of the viewport framed out.
Rendering straight from VRay for Rhino at a width of 436px.
Results of the Viewmaker script exported as an illustrator file and opened in photoshop at the same dimensions as the rendering (width of 436px). Since the size of these two images are the same and they were produced from the same viewpoint the lines will match the rendering perfectly.
Copy paste the lines on top of the rendering, muck with transparency, and voila! Welcome to the cube.
Congratulations, you've passed Elide Modeling School #3!
Next up I think we'll spend a bit of time focusing on tricks to speed up the retouching of drawings in Illustrator. Please feel free to comment below if you have topics or general areas of concern that you would like to see covered.
p.s. this entry is dedicated to the 1st semester students in Ortega Studio at the GSD, my people!
")


18 Comments
great tutorial bb.
Back at my old firm, we stole a guy from auralab (www.auralab.com) -- a complete rendering urberfirm. He let me in on some simple trade secrets (altho he wouldn't give up the juicy stuff)
outlines aren't just for the toon/cell shaded effect. A big reason a lot of rendered images just don't feel "real" is because of all the perfect right angles we make in the models. In real life, there is no such thing as a perfect right angle -- things weather, edges get rounded. By using an extremely light pen thickness and overlaying either specific parts of a final rendered image, or the whole thing, you can simulate the slight shadow effect that comes from these weathered edges. I believe Auralab uses a program called "Illustrate!" to get their hidden line images done (its a great tool for those of us 3dMax junkies who otherwise lack an option to render to vector format).
Another technique (which your tutorial touches on) is learning to render shading/ outline /reflections/ highlights/ and deep shadow all on different layers, so when you composite them in photoshop, you can really tweak the way your renders feel. But perhaps, thats another episode of EMS. :D
Arjun, I'm not going to cover multipass rendering because it gets so specific to the individual applications that you use. But, yes, it's immensely powerful as a way of working. That's Double Elite Modeling School!
for imperfection in lines arjun have you ever tried Skribble ?
http://www.procadsys.co.nz/Skribble.html
Nice Day 3 Bryan on the same day RC3 comes out with notes hinting to V5's near readyness.
I doubt V5 is anywhere near ready since V4 was in public beta for years before they were ready to make it official. Rest assured we'll get to play with it for a long time before they release it.
For complex geometry though, make2d can take awhile, it may not have vector output, but Penguin is wicked fast and will give you a nice layer to "multiply' in Photoshop.
Can't wait for more on Illustrator, though, I'm too heavy on the PS side and need to figure out how to work with them vectors. Thanks again Bryan. And when is the shirt coming?
Penguin 2 has vector output
what things can illustrator do that Rhinoceros can't for you?
Illustrator has the pen tool.
/end discussion.
Bryan did you leanr Rhino at the GSD or on your own,
I have been using rhino for little while now, but have had to learn it on my own. I still dont understand how to rhinoscript....or if I even know what rhinoscript is.....
I have learn from Rhino turotials that came with the manual and some cool tutorials online....
I am assuming Rhinoscripting is like Autcad Lisp Routines.
if I want to show a Section of a Model, Is there an easy way of doing this, or do I have to use the split command and totally cut my model in half..
DifficultFIX,
try the "section" and "clipping plane" commands.
THNX yupe
rhino 4 has the same 'pen' tool , what else ?
i like interpolate points better.
You must have had better luck with Penguin2's vector output, cause I have yet to have any measure of success.
DifficultFX- you can use "section" but it will not give you all of the information that's in elevation 'behind' the cutplane. This is why yupe's suggestion of cutting your model in half and then doing a "make2d" on the half that remains is the best way to get the actual section cut AND the stuff behind it as seen in elevation.
As for learning Rhino, I learned it mostly on my own and by asking friends how to do stuff. Rhinoscript and VB are similar to other scripting languages that I have previous experience with, so that's fairly easy for me to get into but I am by no means a VB expert. In fairness, I should mention that the GSD has now instituted a series of non-coursework workshops that teach everything from Rhino, Sketchup, GIS, and 3dMax to public speaking.
Public speaking? Awesome, someone should do 'Elite Public Speaking School'.
rule one of Elite Public Speaking School:
pants optional.
Great Blog posts, how long will we have access to the directory with the scripts? Should we be downloading them now even if we might not get around to the tutorials till thanksgiving break, or do you anticipate them being available there for a while?
I don't anticipate taking the scripts down any time soon... but standard disclaimers apply: if my server goes up in flames tomorrow you've been warned.
Also, I have used the used the the render wire frame under the TOOLS>OPTIONS...and on the FLAMINGO line of the DOCUMENT PROPERTIES you can go to the bottom and check Render wire-frame. Next you have to set all of the objects in the model you are rendering to '0' Iso-curves under the 'properties' section for each object. Now I have also discovered that in Rhino 3 you may have to go back and re-check the "Render Wire-frame" after each change you make, not sure why it doesn't stay checked. Sorry if this was already covered and I missed it in skimming through the posts.
Block this user
Are you sure you want to block this user and hide all related comments throughout the site?
Archinect
This is your first comment on Archinect. Your comment will be visible once approved.